
Cover That Cover!
Preserving and Storing First Day Covers
By Alan Warren
Cover collectors should approach the hobby with a bit of attitude adjustment. The thought that must be adjusted is that we are NOT owners of our covers, but merely temporary custodians. These objects of our affection will ultimately be traded, sold, or donated to another individual or organization. In the meantime, while they are in our possession, they must be given proper care to preserve them for future custodians.
Although the principals outlined in this article apply equally to patriotic covers, event covers, inaugural covers, first flight covers, advertising covers, stampless folded letters, and similar collectibles, the focus will be on first day covers.
What sort of environment do covers like? Well, the same that we all like—a comfortable temperature and air-conditioning when appropriate. They do not like being relegated to an attic where they will be exposed to the dust, heat, and cold of the passing seasons. They do not like basements where moisture and dust will hasten their demise. No collector likes to paw through a box of moldy-smelling covers, and those covers do not deserve such treatment. Pests can also cause havoc, such as those paper-loving vermin called silverfish.
Each cover deserves a home of its own, known as a cover sleeve. In the old days covers were placed in glassine envelopes, similar to the small ones used for storing stamps. Although glassine is made from cellulose, the same as ordinary paper, it also suffers effects with time like turning yellow or brown, becoming brittle, and staining along the glue lines that were used to assemble the envelope.
Fortunately hobby suppliers offer many varieties of cover sleeves made from several plastics. While in the past there were poor plastics, the ones used today are pretty safe to use for preserving first day covers. The one bad actor was a type of vinyl sleeve. Polyvinyl chloride film came in two forms: plasticized (to make them more supple) and non-plasticized.
The problem arose when the plasticizer migrated over time. Side effects like bleeding of postmarks, handstamps, cachet inks, fading of stamps, and discoloration in general, caused premature demise of the sleeve’s contents. Such sleeves, and even some of the older clear-view cover albums that used vinyl pockets, often curled, yellowed, and even became sticky or oily when touched. If you find vinyl sleeves or albums with those characteristics, remove the covers, rehouse them in safer plastics, and destroy the old sleeves and albums.
Today cover sleeves and cover albums with clear pages of vinyl are made of the non-plasticized variety. Some supply dealers refer to their products as made from “safety vinyl.” Other plastic films used to make cover sleeves include polypropylene, polyethylene, and to some extent polystyrene. However, the ideal plastic for long-term storage is PET or polyethylene terephthalate. It is sold commercially under trademarks like Mylar® or Melinex®, and is sometimes referred to as polyester. PET should be handled carefully as it is easily scratched. However it is the most inert of the plastic films and is used by libraries and museums the world over to store and protect paper items. Polyester film is used not only for cover sleeves but also corner mounts, page protectors for exhibiting, and storage of individual paper objects or ephemera.
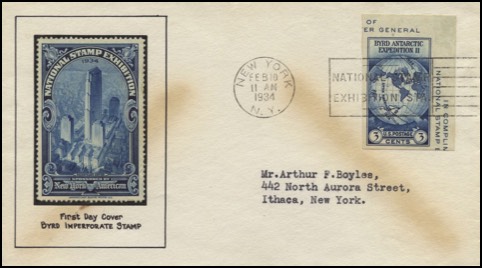
Figure 1
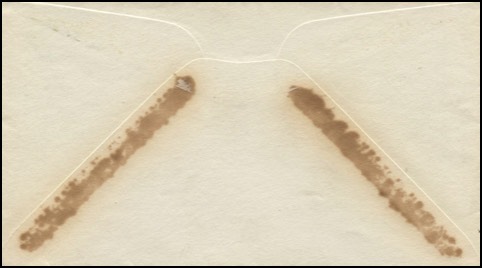
Figure 2
Stuffers
FDC servicers often insert a stuffer or stiffener in covers before they are cancelled. This practice helps insure a clearer strike of the postmark. However, the materials used for inserts can harm the envelopes over time. The sender may have used what he thought was good quality paper but with time it has turned color—an indication that it was made with an acid-containing paper that now threatens to stain your cover. Newsprint is one of the worst culprits as newspapers are typically printed on poor quality paper with a short life expectancy.
Every cover should be examined for possible contents. If they are unsealed, the task is easy. Just look to see if any loose stamps, advertising stuffers, newspaper articles, or other items of interest are there. Newspaper or magazine articles, and even handwritten or typewritten personal notes or letters, may offer background information about the first day cover.
Dealers’ stuffers may advertise their stock or provide clues about their business operations. Such stuffers should be removed to prevent any damage they might cause the cover. If they have information about the dealer or servicer, the stuffer can be mounted on an exhibit page along with the cover in which it was found (Figure 3, below). If the stuffer was found to be useless newsprint, tablet paper, or cardstock, it can be discarded, and replaced with a piece of polyester to help the cover survive the coming years.
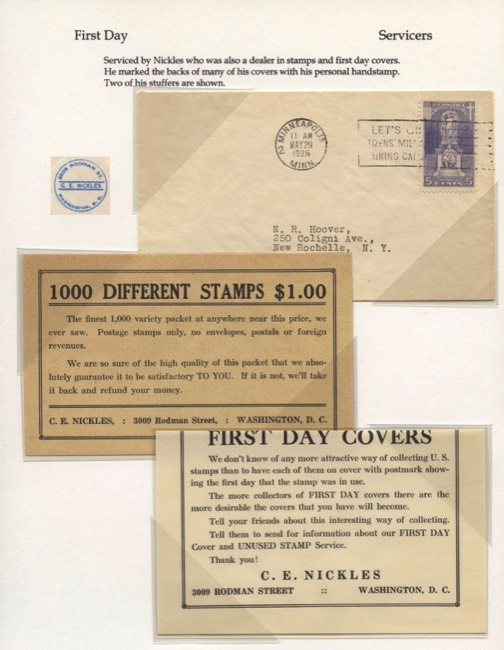
Figure 3
There are several techniques. The old-fashioned method of “steaming” or otherwise applying moisture to the seal may irreparably harm the cover. Wrinkles may form in the cover. Water-soluble ink used for the address may run. Two other methods are suggested. Many covers were quickly sealed, or may have sealed themselves due to exposure to high humidity. The seal is therefore not very strong and such covers often can be opened by slipping a thin knife blade under the edge of the flap and moving it along between the flap and the cover itself. You may be surprised how often this technique works with no resulting damage to the cover.
However, if the seal is tight and the knife blade approach fails, then carefully cut the edge of the envelope, usually the end opposite from where the stamp and cancel are. While scissors or a letter opener will work, these methods may result in a rough or irregular cut. A better way is to use a paper cutter, which yields a straight neat cut. Contents can then be remove and either saved or discarded, and a polyester stuffer inserted to prevent bleeding of glue stains.
Pencil Markings
Recommendations on preserving first day covers must also address pencil notations. How many times have you walked past a cover exhibit and noticed penciled marks of a Scott catalog number or a selling price? Such markings detract from the cover. Even though most dealers and collectors use a very soft lead pencil, a few irresponsible ones have used a hard lead that inevitably leaves indentations on the cover, even if the pencil marks are erased. Removing pencil marks can be challenging. A gum rubber eraser such as sold in art supply stores works well. Be careful of older covers with brittle paper that might tear when using an eraser.
If you want to record catalog or price information, use a computer, or even a separate piece of paper with a handwritten note. Sometimes marks are made on the back of the cover but I would avoid even doing that and try to leave the cover in its original condition. One exception is the note that an add-on cachetmaker might place on the back of the envelope to indicate how many such add-ons were made and the date it was applied.
The American Philatelic Society has a Preservation and Care of Philatelic Material Committee. Collectors of both stamps and covers are urged to review the topics found on the committee’s web site http://stamps.org/Preservation-and-Care. In addition to a review of the plastic sleeves, one can learn about use of glue sticks, temporary adhesive notes, hinges, cleaning stamps and covers, removing tape residue, watermark detectors, and many other topics.
Armed with this knowledge, collectors can not only enjoy their collectibles but also help preserve them for future generations of hobbyists.